
Introduction to Italian Sub Sliders
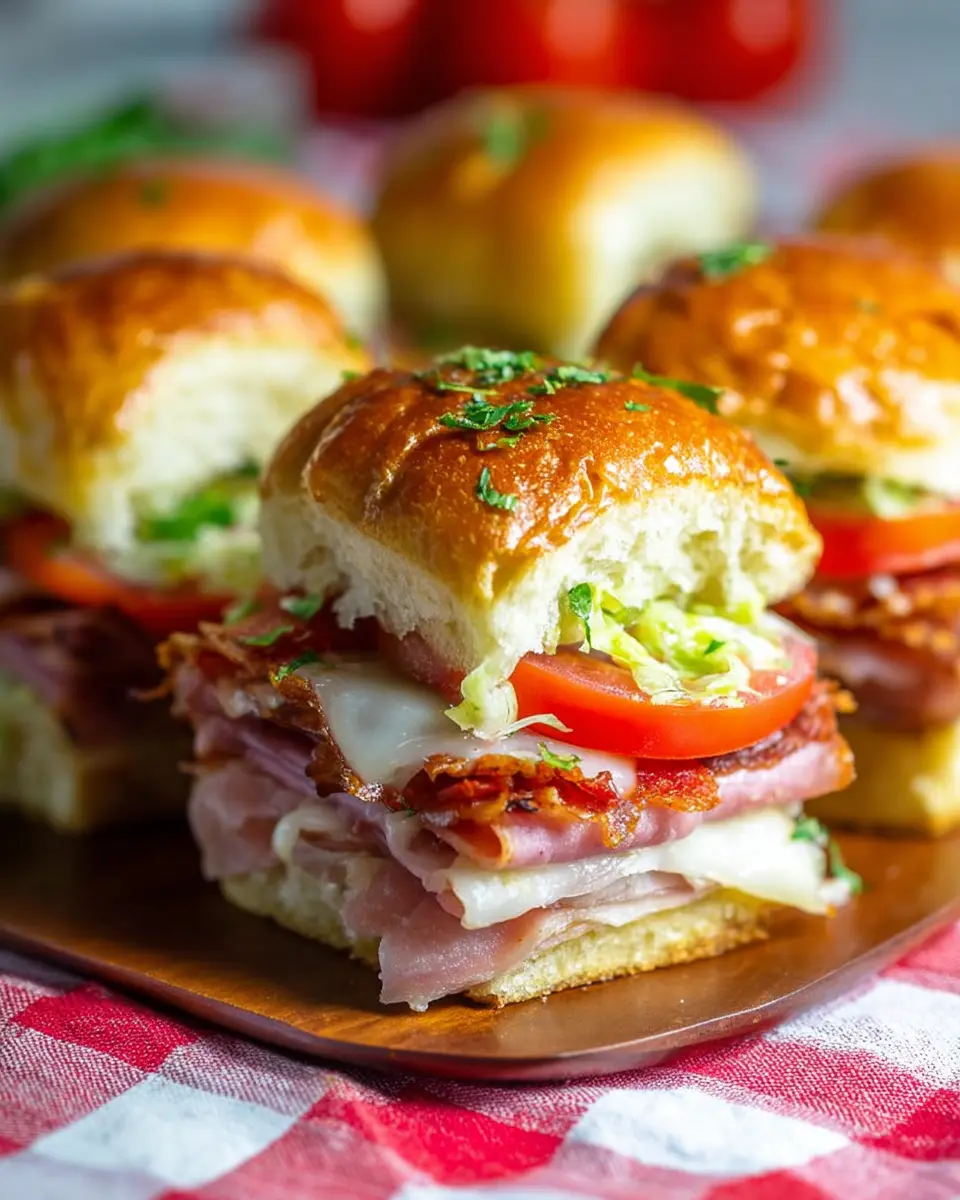
If you’re a young professional juggling a busy schedule, Italian Sub Sliders are about to become your go-to meal. These delightful mini sandwiches are not only a delicious treat; they pack in flavor and nutrition while being oh-so-easy to prepare. Perfect for a quick lunch at your desk or a fun addition to your weekend gatherings, they can be assembled in under 15 minutes and baked in just 15 more!
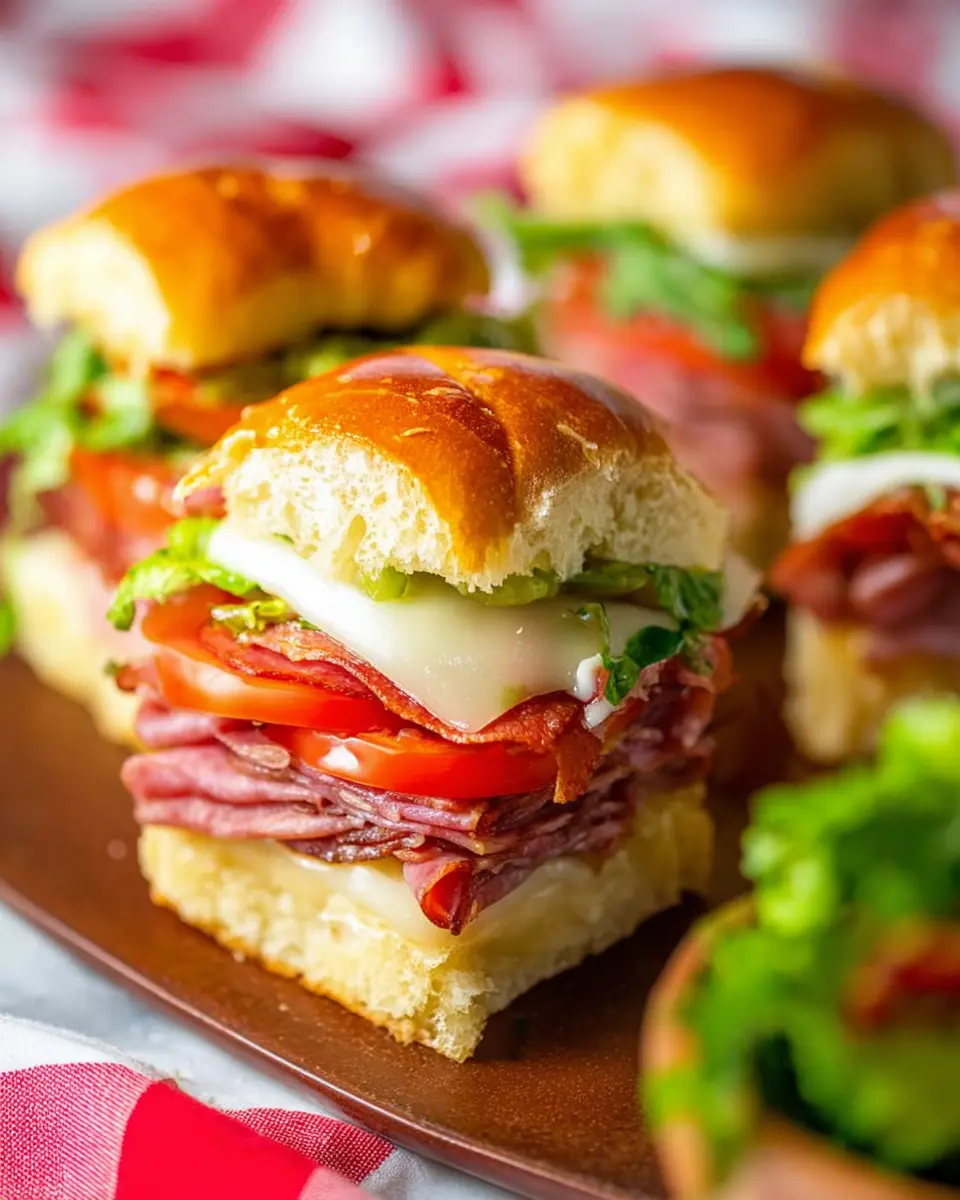
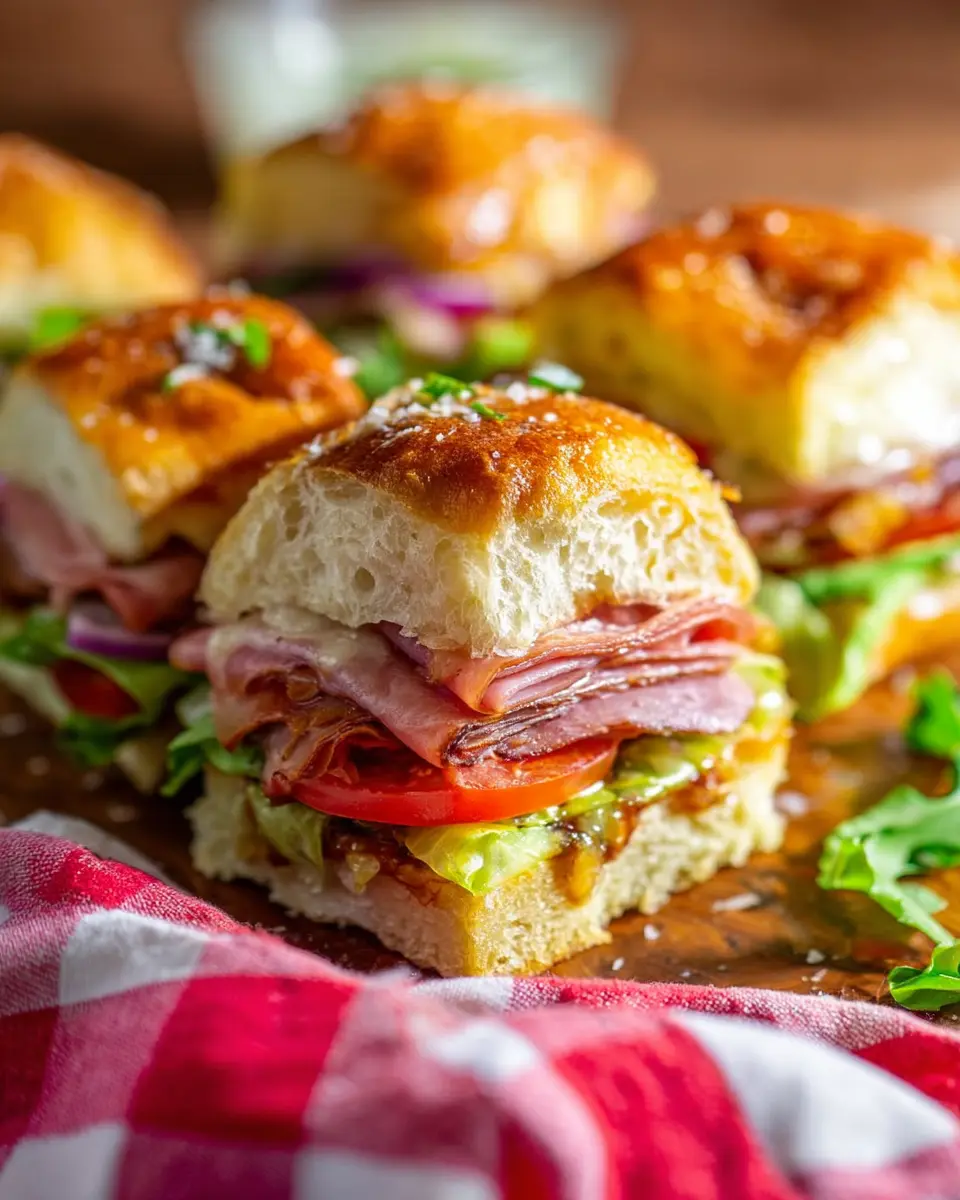
Imagine layers of chicken ham, salami, and pepperoni, all melted together with provolone cheese. Add a crunchy topping of lettuce, onions, banana peppers, and roasted red peppers tossed in zesty Italian dressing, and you’ve got a meal that impresses without the effort. According to a survey by the National Restaurant Association, sliders are among today’s hottest menu trends, and it’s no wonder why. They are versatile, allowing for customizations that cater to any palate or dietary preference. Feel free to swap in turkey bacon or go heavy on the veggies!
Next time you’re hosting friends or need a quick weeknight dinner, consider these Italian Sub Sliders—your taste buds will thank you, and your guests will be asking for the recipe! For more fun meal ideas, check out this resource for inspiration.
Ready to dive into the recipe? Let's get started!
Ingredients for Italian Sub Sliders
Essential ingredients for a flavor-packed slider
Creating Italian Sub Sliders requires a blend of rich and vibrant flavors. Here’s what you’ll need for the ultimate slider experience:
- 12 count Hawaiian rolls – they add just the right sweetness.
- ¼ pound chicken ham – a lean, flavorful meat choice.
- ¼ pound deli salami – for that classic Italian taste.
- ¼ pound deli pepperoni – a little spice never hurt anyone!
- 12 slices of provolone cheese – melty goodness that binds everything together.
- 3 tablespoons of butter – for that golden glaze.
- ½ teaspoon of Italian seasoning – to enhance the flavor profile.
- Fresh veggies like 2 cups of shredded lettuce and half a small red onion.
- Toppings like ¼ cup of banana peppers and ¼ cup of roasted red peppers.
- A mix of 1 tablespoon of mayo and ¼ cup of Italian dressing for a creamy finish.
Optional additions to customize your sliders
If you want to put your own spin on these Italian Sub Sliders, consider adding:
- A few slices of turkey bacon for extra crunch.
- Fresh basil or arugula instead of lettuce to elevate flavor.
- Avocado slices for a creamy texture.
- A drizzle of balsamic glaze for sweetness.
Tailoring your sliders to your tastes is a delightful way to make the dish your own! If you’re curious about pairing suggestions, try this slider with a sparkling soda for a refreshing accompaniment. For more tips on perfecting your sliders, check out The Kitchn’s guide on sliders.
Preparing Italian Sub Sliders
Making Italian Sub Sliders is a fun and rewarding culinary adventure! These mouthwatering appetizers combine savory ingredients that are sure to please everyone. Let’s dive right into this straightforward process, step by step.
Gather and prep the ingredients
First things first, you’ll want to assemble all your ingredients. Having everything on hand makes the process smoother. Here’s a quick checklist to follow:
- 12 count Hawaiian rolls
- ¼ pound deli chicken ham
- ¼ pound deli salami
- ¼ pound deli pepperoni
- 12 slices provolone cheese
- 3 tablespoons butter
- ½ teaspoon Italian seasoning
- 2 cups shredded lettuce
- Half of a small red onion, sliced
- ¼ cup banana peppers
- ¼ cup roasted red peppers
- 1 tablespoon mayo
- ¼ cup Italian dressing
Preheat your oven to 350 degrees Fahrenheit while you’re at it. It’s always a good idea to get the oven ready; this way, you can focus on assembling your Italian Sub Sliders without interruption.
Assemble the sliders
Next, let's layer those delicious ingredients. Slice the Hawaiian rolls in half, placing them on a parchment-lined baking sheet for easy cleanup. Begin by placing 6 slices of provolone on the bottom halves of the rolls. Next, layer on the chicken ham, salami, and pepperoni. Finish this savory stack with the remaining slices of provolone.
Bake for that perfect melty goodness
Here’s where the magic happens! Melt the butter in a microwave-safe bowl and mix in the Italian seasoning. Brush this buttery goodness over the top of the rolls. Now, pop the sliders into your preheated oven and bake for about 15 minutes, or until the rolls are golden brown and the cheese has that wonderful melty quality. The aroma will have your mouth watering!
Create the irresistibly fresh topping
While the sliders are baking, it’s time to whip up that fresh topping. In a large bowl, combine the shredded lettuce, sliced onion, banana peppers, and roasted red peppers. Stir in the mayo and Italian dressing. For a fun twist, use kitchen scissors to chop the salad mixture right in the bowl until it's finely chopped. This not only makes it easier to serve but also helps the toppings meld beautifully.
Combine and serve
Once your Italian Sub Sliders are golden and cheesy, remove them from the oven. Place a generous amount of the chopped topping on the bottom halves of the sliders, then cap them with the top halves. Slice those mouthwatering sliders, serve them on a platter, and watch as everyone raves about them! Feel free to pair with an iced tea or a refreshing soda for the ultimate experience.
This process is not just about creating a meal; it’s about bringing friends and family together around a delicious dish. Enjoy your sliders and the company you share them with!
Variations on Italian Sub Sliders
Vegetarian Italian Sub Sliders
Looking for a meat-free option? Try these Vegetarian Italian Sub Sliders! Replace the meats with layers of grilled zucchini, roasted red peppers, and marinated artichokes. Top it all off with fresh mozzarella for a delightful twist. You’ll still get that satisfying cheesy goodness and crunch from the fresh veggies. This variation makes them perfect for gatherings, catering to all types of diets. Plus, it’s a fantastic way to sneak in some extra nutrients. For a great veggie dish, check out more ideas on The Vegetable Butcher.
Spicy Italian Sub Sliders
If you crave a kick, the Spicy Italian Sub Sliders are for you! Substitute spicy capicola for the usual meats and add jalapeños or a drizzle of sriracha for extra heat. This fiery version pairs wonderfully with a creamy dressing to balance the spice, keeping your taste buds dancing. Consider serving them with a side of spicy pickles for an added crunch. Interested in more recipes? Visit Chili Pepper Madness for a range of fiery dishes sure to spice up your menu!
Cooking Tips and Notes for Italian Sub Sliders
Perfecting the Cheese Melt
To achieve that gooey, melty cheese that makes your Italian Sub Sliders irresistible, opt for a high-quality provolone. Placing the cheese on both the top and bottom halves of your sliders ensures even melting. Keep an eye on your slider while baking—once the cheese starts to bubble, you're almost there! For an extra crispy topping, broil for the last 1-2 minutes, but don’t walk away; broilers can be tricky!
Tips for Even Baking
Avoid uneven baking by making sure all sliders are spaced out properly on the baking sheet. This helps hot air circulate around them, promoting that perfect golden crust. Preheating your oven is crucial as well; an oven at the right temperature sets a solid foundation for cooking. For best results, use parchment paper—it helps prevent any sticking! Want a tip? Rotate the baking sheet halfway through baking for consistently delicious sliders.
For more on perfect baking techniques, check out this guide from Bon Appétit.
These small adjustments will elevate your sliders, making them a go-to for any gathering or a cozy night in!
Serving Suggestions for Italian Sub Sliders
Pairing with sides for a complete meal
To elevate your Italian Sub Sliders into a full meal, consider serving them with crispy sweet potato fries or a vibrant mixed green salad. You could also whip up some creamy coleslaw for a refreshing crunch. If you want a crowd-pleaser, consider pairing your sliders with homemade potato chips seasoned with rosemary and sea salt. These sides not only complement the flavors of the sliders but also add a delightful variety to your table.
Creative plating ideas for gatherings
When it comes to entertaining, presentation matters! Arrange your Italian Sub Sliders on a rustic wooden board and accent with fresh basil or parsley for a pop of color. You can even use mini wooden skewers to hold them together for easy grabbing. For a fun twist, consider placing small bowls of dipping sauces like marinara or a zesty aioli beside the sliders, allowing guests to customize each bite. They'll love the interactive aspect while enjoying your delicious creation!
For more ideas on side dishes, check out Food Network's side options.
Time Breakdown for Italian Sub Sliders
When your cravings kick in, knowing how much time you need can make all the difference. Here’s a quick snapshot of the Italian Sub Sliders process:
Preparation Time
15 minutes
In just a quarter of an hour, you can have everything ready to go. This includes slicing, layering, and mixing those delicious toppings.
Cooking Time
15 minutes
A quick bake in the oven for 15 minutes is all it takes to turn these sliders melty and golden.
Total Time
30 minutes
With a total of only 30 minutes, you can serve up these delightful Italian Sub Sliders faster than your favorite takeout could arrive!
For anyone eager to whip up an incredible meal without spending the whole evening in the kitchen, this is a perfect option. And when you're ready for more creative meals, check out this guide on easy weeknight dinners or explore quick appetizer recipes for your next gathering!
Nutritional Facts for Italian Sub Sliders
When you're enjoying these Italian Sub Sliders, it's good to know what you’re putting into your body. Here’s a quick glimpse of the nutritional facts that make these tasty delights both satisfying and enjoyable for gatherings or quick meals.
Calories per slider
Each slider contains approximately 180 calories, making them a delicious option without overwhelming your daily intake.
Protein content
You'll find about 10 grams of protein in each slider, thanks to the mix of chicken ham, salami, and provolone cheese. It’s a great way to fuel your day!
Sodium levels
Keep in mind that these sliders have around 500 mg of sodium per serving. If you're watching your salt intake, consider enjoying them in moderation or pairing with fresh veggies for a lighter meal.
For more insights on healthy eating, check out resources from the USDA or the Academy of Nutrition and Dietetics. Balancing enjoyment and nutrition can truly make a difference in your culinary adventures!
FAQs about Italian Sub Sliders
Can I make these sliders ahead of time?
Absolutely! You can assemble the Italian Sub Sliders up to a day in advance. Just cover them with foil and refrigerate until you're ready to bake. This makes them a fantastic option for game day or meal prep, so you can enjoy that stress-free time with friends or family.
What are some good dipping sauces?
Dipping sauces can elevate your sliders to a whole new level! Consider these tasty options:
- Garlic aioli – for a creamy kick.
- Marinara sauce – your favorite pizza-inspired dip.
- Spicy mustard – to add some heat.
Feel free to get creative based on your preferences!
How do I store leftover sliders?
If you happen to have any leftover Italian Sub Sliders, store them in an airtight container in the refrigerator. They’ll stay fresh for about 2-3 days. When you’re ready to enjoy them, just pop them back in the oven for a few minutes to warm up and melt that delicious cheese again!
Conclusion on Italian Sub Sliders
Reinvent your meals with these delicious bites!
These Italian Sub Sliders are not just a casual snack, but a delightful experience for your taste buds. Perfectly baked with savory layers of chicken ham, salami, and provolone, they promise to elevate any occasion. Add them to your meal rotation, and enjoy easy, flavorful dining!

Italian Sub Sliders
Equipment
- Oven
- baking sheet
- microwave-safe bowl
- large bowl
- scissors
Ingredients
Meats and Cheese
- ¼ pound deli ham
- ¼ pound deli salami
- ¼ pound deli pepperoni
- 12 slices provolone
Buns and Condiments
- 12 count hawaiian rolls
- 1 tablespoon mayo
- ¼ cup italian dressing
Vegetables
- 2 cups shredded lettuce
- ½ small red onion, sliced
- ¼ cup banana peppers
- ¼ cup roasted red peppers
Seasoning and Topping
- 3 tablespoons butter
- ½ teaspoon italian seasoning
Instructions
Preparation
- Preheat your oven to 350 degrees.
- Slice the rolls in half and place them on a parchment lined baking sheet.
- Place 6 slices of provolone on the bottom half of the rolls.
- Next layer the ham, salami and pepperoni.
- Top with the remaining provolone.
- Melt the butter in a small microwave safe bowl.
- Stir the italian seasoning into the butter.
- Brush the top of the rolls with the butter.
- Bake for 15 minutes until the rolls are golden and the cheese is melted.
Mixing Vegetables
- Meanwhile in a large bowl combine the lettuce, onion, banana peppers, roasted red peppers, mayo and italian dressing.
- Using scissors chop the lettuce mix in the bowl until it is chopped into small pieces.
Assembly
- Place the lettuce mixture onto the bottom half of the rolls.
- Top with the top rolls.
- Slice and serve!

Leave a Reply