
Introduction to Crunchy Chicken Caesar Sandwich
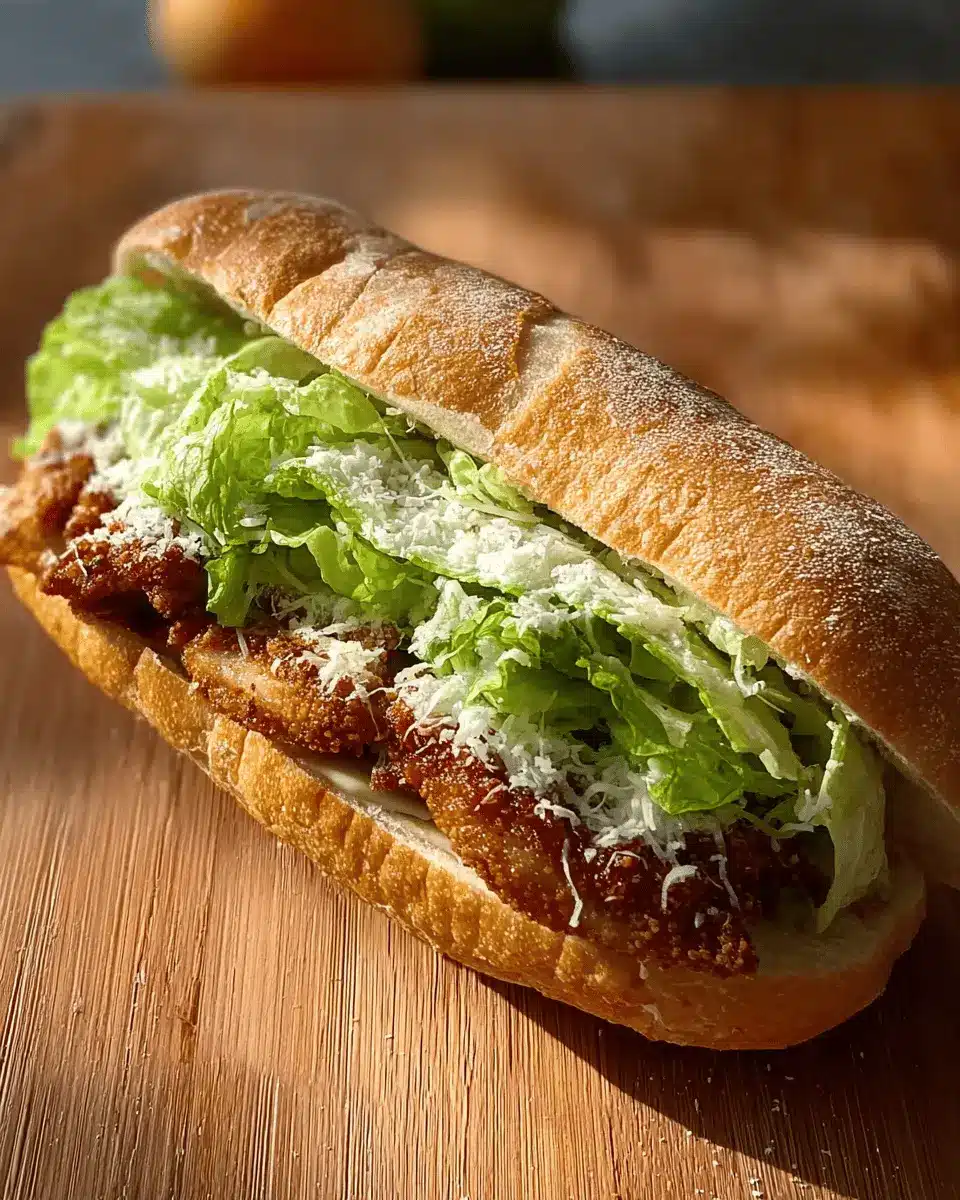
If you haven’t tried the Crunchy Chicken Caesar Sandwich, you’re in for a delightful surprise! This sandwich brings together the crispiness of golden-browned chicken cutlets and the fresh, zesty flavors of Caesar salad nestled in a toasted sub roll. Imagine biting into a sandwich that perfectly balances texture and taste in every single bite; it’s pure heaven!
What makes the Crunchy Chicken Caesar Sandwich a must-try?
There are so many reasons to love this scrumptious creation! For starters, the combination of tender, juicy chicken and the crunch of fresh romaine lettuce offers a satisfying contrast that leaves you craving more. The homemade garlic butter elevates the flavor, giving your taste buds an experience that store-bought sandwiches just can't compete with.
Plus, it’s easily customizable. You can swap in your favorite toppings, like avocado or even Turkey Bacon for a savory kick. Did I mention it’s also a fantastic way to impress guests or simply treat yourself after a long week?
Want to learn more about utilizing fresh ingredients and making the most of your meals? Check out this guide on the importance of fresh produce in your diet.
Get ready to roll up your sleeves and create this amazing Crunchy Chicken Caesar Sandwich. You won’t regret it!

Ingredients for Crunchy Chicken Caesar Sandwich
Essential ingredients for the sandwich
To whip up a truly delightful Crunchy Chicken Caesar Sandwich, you'll need a handful of key ingredients that come together to create a fusion of flavors and textures. Here’s what you'll need:
- Sub Rolls: Opt for crusty sub rolls that can hold all the delicious fillings.
- Chicken Tenderloins: Tenderized for that melt-in-your-mouth experience.
- Romaine Lettuce: Freshly chopped for that crisp, refreshing crunch.
- Parmesan: Freshly grated to sprinkle on top or within the sandwich.
- Lemon Juice: Adds a zesty brightness to balance flavors.
- Caesar Dressing: Both for tossing the salad and as part of the breading.
- Breading Ingredients: Flour and breadcrumbs or panko for the ultimate crunch.
- Avocado Oil: Perfect for frying your chicken until golden brown.
Optional ingredients for added flavor
For those of you looking to elevate your Crunchy Chicken Caesar Sandwich experience, here are some optional ingredients that can really make a difference:
- Turkey Bacon: For a smoky, savory kick.
- Avocado: Creamy slices can add richness and freshness.
- Roasted Garlic: A fragrant touch that pairs seamlessly with Caesar flavors.
- Cherry Tomatoes: A pop of color and sweetness that brightens the dish.
Consider exploring tips on substituting ingredients for your diet—who knew that getting creative could taste this good?
Now that you know what to gather, you're one step closer to crafting this delicious sandwich!
Step-by-step preparation of Crunchy Chicken Caesar Sandwich
Making the crunchy Chicken Caesar sandwich is not only a delicious endeavor but also an opportunity to impress friends and family with your culinary skills. Let’s dive into the preparation steps to create a sandwich that’s bursting with flavor and crunch!
Preheat and prepare the garlic butter
First things first—let’s set the mood in the kitchen! Preheat your oven to 350°F. While that’s heating up, it’s time to whip up some delectable garlic butter. In a small bowl, mix together:
- 2 heads of roasted garlic
- 1 tablespoon finely chopped parsley
- 8 tablespoons softened unsalted butter
- ⅛ cup grated fresh parmesan
- Salt and pepper to taste
This garlic butter is what will elevate your bread. Slice the sub rolls and slightly hollow them out to make room for all the goodness. Then, smear a generous layer of this garlic butter on the inside of the rolls. For that extra touch, sprinkle some additional grated parmesan over it. Place the rolls open-side up on a baking sheet, and pop them in the oven for about 10-15 minutes, or until golden and toasty. Want an extra crunchy topping? Broil them for just a couple of minutes!
Prepare the chicken cutlets
While the bread is toasting, let’s get that chicken ready. Set up your breading station with three shallow bowls for easier handling:
- One with flour
- One with Caesar dressing mixed with 2 tablespoons of water
- Lastly, a bowl of breadcrumbs or panko crumbs
Coat each tenderized chicken cutlet in flour, then dip into the Caesar dressing mixture, and finally, cover it with breadcrumbs. This combination will give your chicken that crispy exterior everyone loves.
Cook the chicken cutlets to perfection
Next, it’s frying time! In a large pan, coat the bottom with avocado oil and preheat over medium heat. To check if the oil is hot enough, sprinkle in a few breadcrumbs; if they sizzle, you’re good to go. Fry the chicken cutlets for about 3-4 minutes on each side or until they’re golden brown and crispy. When done, place the cutlets on a plate lined with paper towels to soak up any excess oil. Trust me, this step is key for maximum crunch!
Toss the salad for added freshness
Now, let’s add some freshness to our crunchy Chicken Caesar sandwich. Chop up those two hearts of romaine lettuce and toss them in a bowl with your favorite Caesar dressing. For a little extra zing, squeeze in some fresh lemon juice and add some grated parmesan. This will ensure your salad is as vibrant and flavorful as the sandwich itself.
Assemble the ultimate sandwich
The moment we’ve been waiting for—time to assemble the ultimate Crunchy Chicken Caesar Sandwich! On your toasted sub roll, layer in the crispy chicken cutlet, top it with the dressed salad, and finish with a sprinkle of extra parmesan. That’s it! Your masterpiece is ready to be devoured.
Dig in and enjoy the delightful crunch of your creation, tailored just for you. This sandwich is not just a meal; it’s an experience!
For more tips on perfecting your chicken cutlet, check out Serious Eats for expert advice!

Variations on Crunchy Chicken Caesar Sandwich
Crunchy Chicken Caesar Sandwich with Turkey Bacon
Elevate your Crunchy Chicken Caesar Sandwich by adding crispy turkey bacon for a savory flavor twist. Just cook a few slices of turkey bacon in the same pan after frying your chicken cutlets for a delightful crunch. Layer it between the sub rolls with your crunchy chicken and the fresh salad—this combination adds a smoky richness while keeping the sandwich satisfying and enjoyable. For tips on perfecting that turkey bacon, check out this resource.
Vegetarian Crunchy Chicken Caesar Sandwich
Craving a meat-free version? No problem! Swap out the chicken for crispy roasted chickpeas or a breaded eggplant cutlet. Both options deliver satisfying texture while soaking up that creamy Caesar dressing. For an extra kick, add roasted red peppers and a sprinkle of feta or nutritional yeast. Each bite will remind you of the traditional Crunchy Chicken Caesar Sandwich but with a healthier spin, perfect for a quick lunch or light dinner. Explore more about vegetarian substitutes here.
Cooking Tips and Notes for Crunchy Chicken Caesar Sandwich
Tips for Making the Chicken Crunchy
To achieve that delightful crunch in your Crunchy Chicken Caesar Sandwich, start with a quality breading. Use a mix of panko breadcrumbs for extra crunch, and don't be shy with the seasoning! After breading, let the cutlets rest for a few minutes before frying. This helps the coating stick better. Fry them in avocado oil — it has a higher smoke point than olive oil, ensuring that perfect golden-brown finish without burning. For an extra layer of texture, consider double breading by dipping in flour, then dressing, then breadcrumbs again.
How to Achieve the Perfect Garlic Butter Spread
Creating a rich, flavorful garlic butter is easier than it sounds. Begin by roasting two heads of garlic until soft and caramelized—this adds sweetness and depth. Blend the roasted cloves with softened butter, finely chopped parsley, grated Parmesan, and a sprinkle of salt and pepper. This mixture not only elevates your sub rolls but also ties all the flavors together in your Crunchy Chicken Caesar Sandwich. For an elevated touch, try experimenting with additional herbs like thyme or oregano!
Consider checking out Serious Eats for more tips on achieving the perfect garlic spread.
Serving Suggestions for Crunchy Chicken Caesar Sandwich
Side Dishes That Complement the Sandwich
Pairing the Crunchy Chicken Caesar Sandwich with the right sides can elevate your meal to new heights. Consider:
- Sweet Potato Fries: Their natural sweetness and crispy texture make a delightful contrast to the savory flavors of the sandwich.
- Coleslaw: A crunchy, tangy coleslaw gives a refreshing twist and adds a pop of color to your plate.
- Fruit Salad: Lighten up the meal with a vibrant fruit salad to balance the savory richness.
Make sure to check out this guide on making the perfect sweet potato fries for an added crunch (source: Serious Eats).
Ideal Sauces and Dips to Pair
To truly complement the Crunchy Chicken Caesar Sandwich, consider these delicious sauces and dips:
- Classic Garlic Aioli: This creamy dip enhances the garlic flavors in the sandwich while adding an extra layer of richness.
- Spicy Sriracha Mayo: For those who crave a little heat, this sauce perfectly pairs the crunch with a zesty kick.
- Avocado and Lime Dip: Creamy avocado mixed with zesty lime brings a fresh, flavorful contrast to the sandwich’s savory profile.
Experiment with these combinations for a fun and tasty meal! How do you like your sandwiches? Let us know in the comments!
Time Breakdown for Crunchy Chicken Caesar Sandwich
When you're itching for a delightful meal, knowing the prep and cook times helps you plan better. Here's a quick glance at the time required for crafting your Crunchy Chicken Caesar Sandwich.
Preparation Time
In just 10 minutes, you can gather your ingredients and get everything ready to go. This includes setting up your breading station and chopping up the romaine for that crunchy salad.
Cooking Time
The Crunchy Chicken Caesar Sandwich takes another 25 minutes for cooking. This covers baking your rolls to golden perfection and frying those delicious chicken cutlets.
Total Time
All in all, you’ll spend only 35 minutes from start to finish. Perfect for a quick weeknight dinner or lunch that satisfies both your cravings and your schedule!
Thinking about adding your own twist? You can explore variations for extra flavor! Check out this dressing guide for some inspiration on dressings that complement the Crunchy Chicken Caesar Sandwich.
So, are you ready to dive into this delicious adventure? Enjoy every bite!
Nutritional Facts for Crunchy Chicken Caesar Sandwich
Calories
The Crunchy Chicken Caesar Sandwich packs about 520 calories per serving. This makes it a satisfying choice for lunch or dinner without going overboard.
Protein
You'll get a hearty 30 grams of protein from this delicious sandwich, thanks to the juicy chicken tenderloins and the addition of parmesan cheese. Perfect for sustaining your energy throughout the day!
Sodium
Keep in mind that the sandwich contains approximately 980 milligrams of sodium. It's always wise to balance your meal with low-sodium sides like fresh fruit or steamed veggies to maintain a heart-healthy lifestyle.
For more detailed insights into meal planning and nutritional information, check out resources from the USDA Dietary Guidelines or the American Heart Association.
FAQs about Crunchy Chicken Caesar Sandwich
Can I make this sandwich ahead of time?
Absolutely! The Crunchy Chicken Caesar Sandwich can be prepped a few hours in advance. You can bread the chicken cutlets and prepare the garlic butter beforehand. Just make sure to store the cutlets separately from the sub rolls and salad until you’re ready to assemble. This helps maintain that crispy texture you crave!
What are some good substitutes for ingredients?
If you can't find specific ingredients, no worries!
- Instead of sub rolls, try whole grain bread or wraps for a healthier option.
- Avocado oil can be swapped with olive oil for frying.
- For a vegetarian twist, use grilled tofu slices instead of chicken.
Check out this healthy alternatives guide for more creative substitutions!
How should I store leftovers?
To keep your Crunchy Chicken Caesar Sandwich fresh, store any leftover components separately. Place the chicken in an airtight container and refrigerate for up to three days. The sub rolls are best stored at room temperature, while assembled sandwiches should be consumed immediately for optimal freshness. You can always reheat the chicken in the oven to regain some crunch. Enjoy your delicious leftovers!
Conclusion on Crunchy Chicken Caesar Sandwich
The Crunchy Chicken Caesar Sandwich is a delightful fusion of crispy textures and classic flavors. Perfect for a quick lunch or a casual dinner, this recipe promises satisfaction with every bite. Don't hesitate to experiment with your favorite toppings and enjoy the fresh, homemade goodness that it brings!

Crunchy Chicken Caesar Sandwich
Equipment
- baking sheet
- Large pan
- Small bowl
- Foil
Ingredients
For sandwiches and cutlets
- 4 pieces sub rolls
- 1 lb chicken tenderloins, tenderized
- 2 hearts romaine lettuce, washed, dried, chopped
- Fresh grated parmesan
- 1 piece lemon, juiced
- ½ cup Caesar dressing for salad + for breading
- Breadcrumbs or panko crumbs for breading
- Flour for breading
- Avocado oil for frying
For garlic butter
- 2 heads garlic, roasted
- 1 tablespoon parsley, finely chopped
- 8 tablespoon unsalted butter, softened
- ⅛ cup fresh parmesan, grated
- Salt and pepper
Instructions
Making the sandwiches
- Preheat oven 350°F. In a small bowl, combined all garlic butter ingredients. Set aside. Slice and slightly hollow out sub rolls. Spread garlic butter on inside of rolls and add extra grated parmesan. Place open side up on baking sheet. Bake for 10-15 minutes, or until buttered tops are golden and bread is toasted. Optional- Broil on high for 2-3 minutes to make tops extra toasty.
- Meanwhile, prepare breading station; flour, caesar dressing + 2 tbsps water mixed in, breadcrumbs. Bread cutlets.
- In a large pan, coat bottom with avocado oil and preheat over medium heat. Tip: to test if oil is hot enough, sprinkle a pinch of breadcrumbs in the oil, if they sizzle then the oil is ready for frying. Fry cutlets until golden brown on each side. Place cooked cutlets on plate lined with paper towel to absorb excess oil.
- Prepare salad. Toss chopped romaine in dressing of choice. If using store bought dressing, I always add fresh lemon juice and parmesan to give it more life/flavor.
- Assemble sandwiches - crunchy sub roll, cutlet, salad and extra parmesan. Enjoy!
Roasting garlic
- Preheat oven to 425°F. Cut head of garlic across equator. Place bottoms on a large sheet of foil. Drizzle with olive oil, salt and pepper. Bake for 30-45 minutes, garlic cloves will be golden brown.


Leave a Reply